


“What gets measured, gets managed” – Peter Drucker
Do you have a Google My Business listing? You know, these things:

If you’re like most, then visits to your website via your map listing will be simply tracked as “Organic” in your Google Analytics profile, leaving you with no way to attribute traffic and sales to this traffic source. Fortunately, there’s a very simple method to implement such tracking in your Google Analytics profile. Even better news, this method works just as well for one listing as it does multiples!
Custom Campaigns
In order to collect the extra data, we need to setup what’s known as a “Custom Campaign”. Google explains these as:
“When you have a URL in your ad, for example, in a web ad or in an email, you can add parameters to that URL in order to capture important reporting data about your campaign like the site on which the ad appeared, the campaign name, and keywords you used in the ad.”
Sound simple? It is!
Step 1: Identify Pages To Track
Firstly, we need to identify the pages we want to drive traffic to and track. Depending on how your business is structured and how your website is setup, you’ll most likely be driving users to one of the below pages:
- Your homepage
- https://www.yoghurtdigital.com.au
- A contact page
- https://www.yoghurtdigital.com.au/contact
- Individual location page(s)
- https://www.yoghurtdigital.com.au/sydney
- https://www.yoghurtdigital.com.au/melbourne
For the purpose of this article, we’ll be using the Yoghurt Digital homepage as an example.
Step 2: Build Tracking URLs
Now that we’ve identified the pages we’ll be tracking, we need to create a modified URL string to contain some extra information that will then help feed data into Google Analytics. Thankfully this is a relatively easy process using the Campaign URL Builder that Google provides.
Navigate to the Campaign URL Builder and fill in the fields as below, but replacing our domain with yours:
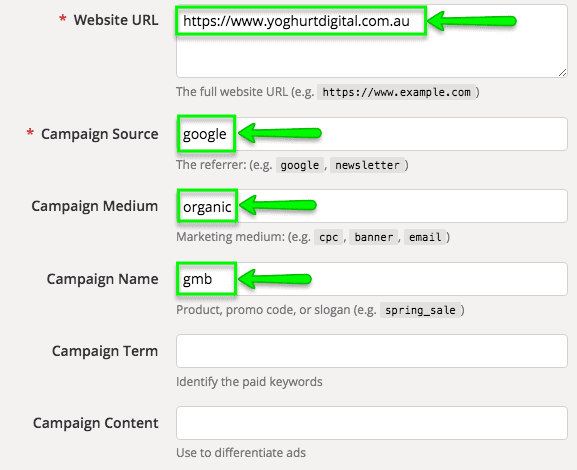
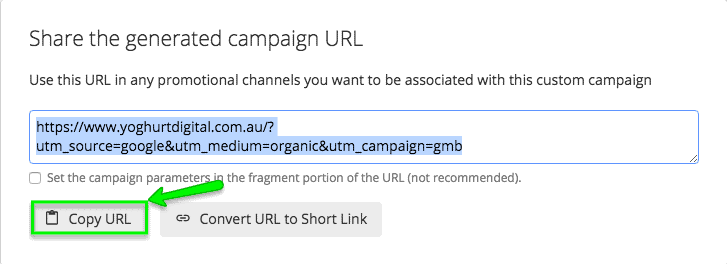
You’ll then be presented with a new URL containing all the extra information you need to push through to Google Analytics. Ours looks like this:
What If I’ve Got Multiple Listings / Locations?
Sticking with the example of our own business above, you’ll want to ensure that the “Campaign Content” field in the URL builder is filled in correctly by making sure it contains a unique identifier for each listing, such as “sydney” or “melbourne” (we recommend using lowercase here for simplicity). This will make sifting through the data much easier – more on that later!
Step 3: Update Google My Business
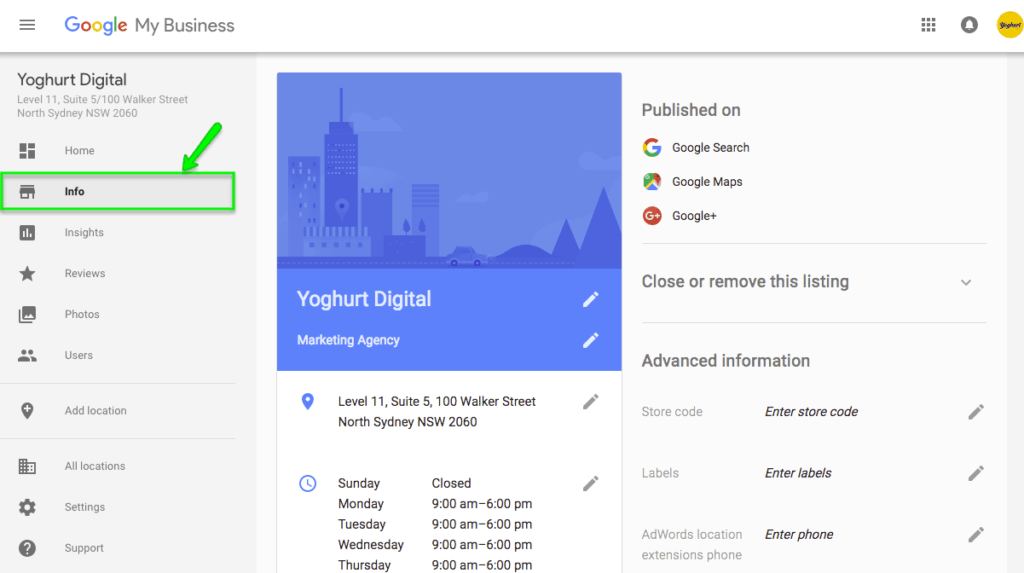
Once we’ve got our new trackable URL, we need to login to Google My Business and let them know of our changes. Head on over to the Google My Business portal and login and scroll down to find the listing you want to update and click “MANAGE LOCATION”. Then click “Info” on the left side menu:
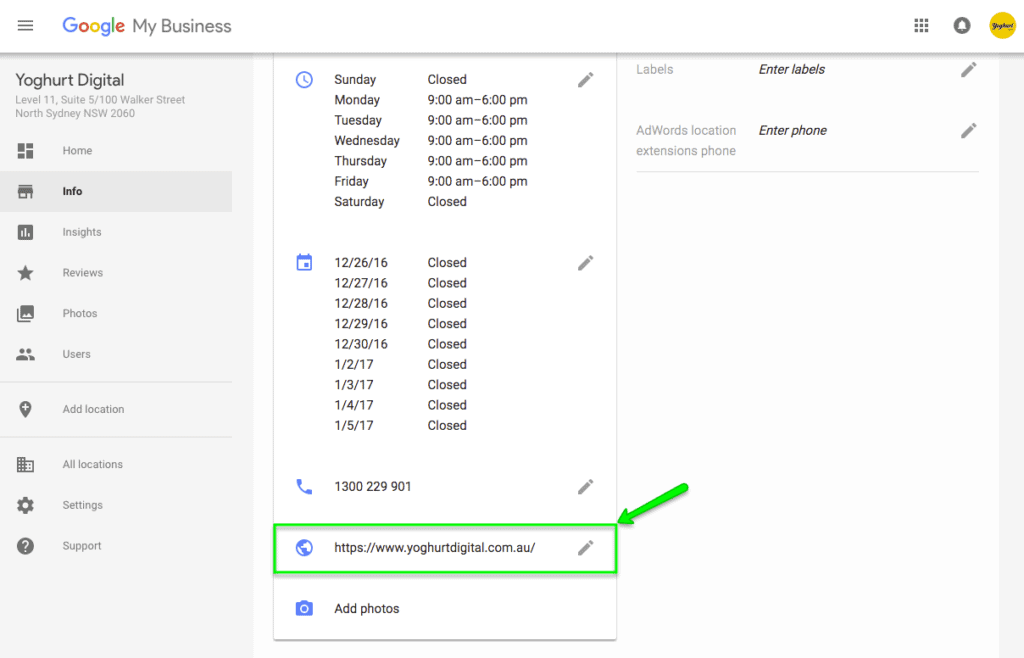
Scroll down to see your current website URL. Click the pencil icon to edit and copy your new URL in, clicking “Apply” to save.
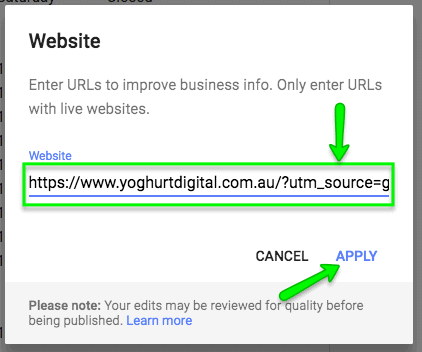
You may receive a warning that your changes are pending review and make take three days to be published. We’ve found that as long as you aren’t making dramatic changes like updating your physical location, this isn’t anything to worry about – our changes were reflected almost instantly.
Step 4: View Campaign Data in Google Analytics
Now all of the hard work is complete, we’re able to tap into our Google Analytics account and learn more about who’s clicking on the Google Maps listing! We’ll be looking purely at sessions in this example.
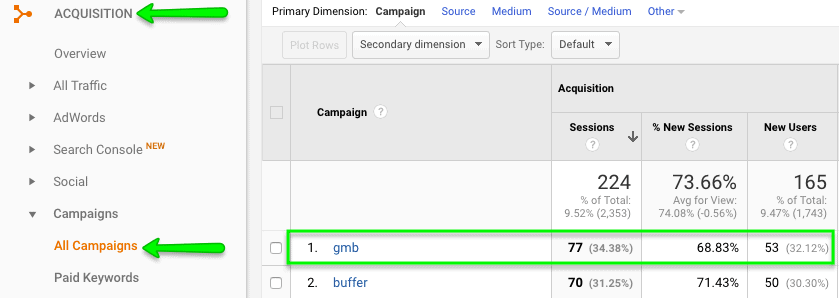
Login to your Google Analytics account and select the appropriate profile. Then navigate to: Acquisition > Campaigns > All Campaigns. Find the campaign “gmb”. This will show you all of the visits through to your website that came from the “WEBSITE” button on the map listing:
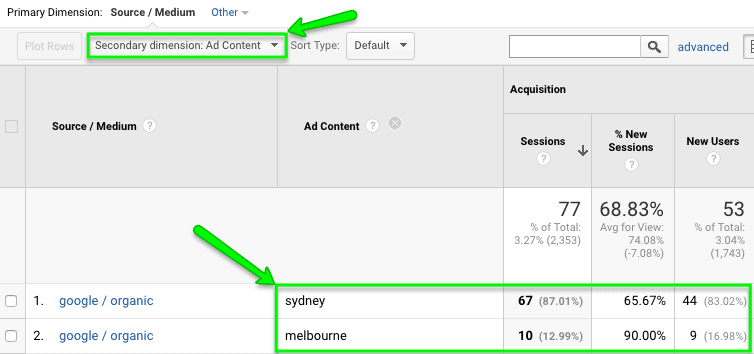
To see data on multiple locations, click into the “gmb” campaign and set a secondary dimension of “Ad Content”, which will split out the campaign into the relevant subsets – like so:
Next Steps
Once everything is tracking along nicely, you only need to login to Analytics to gain a quick snapshot of how the listings are performing over time. There are of course many more things we can do with this data by creating custom segments and following the user journey, however that will most likely be an article all in itself. For now, you’ve at least got more visibility into what your Google My Business listings are actually doing for you!